As you can see the blog hasn’t been updated in quite a bit of time and most of the previous posts have been about the GameBoy. We’ve had a bit of free time on our hands so have been busy working on projects and mods (most of which can be listed in our shop) but since starting up our Discord server, it’s easier to post real time updates there than writing up entries on the blog which can take a few hours at a minimum. A few ideas have come from the users there and users can talk about their own projects too.
So let’s have a look at the projects and mods we’ve worked on!
AdvanceVGA
After playing around with the GBA LCD, I wanted to make a GBA handheld with a 7″ LCD screen (that accepts TTL) with our own LCD voltage control board but before that it made sense to try outputting it to a VGA monitor first. It was the first time I ever needed to use an FPGA and went with the Intel 10M02 because it ran off a single 3.3V rail, had a PLL, was a QFP package and didn’t need an external EEPROM. It did take a while to complete, it started off with using an SRAM but using a circular buffer the 10M02 had just enough internal RAM to make it work, timing was pretty tight. We added a wireless GBC receiver so it can also be played with our wireless GBC TX carts.
LiPo Battery Gauge for the GBA
Having a 2 colour LED for the GBA battery is alright but why not have more so you can see the exact state. This was the idea with the LiPo Battery Gauge project by using a clear GBA shell we could fit in quite a bit of LEDs in the front. Due to the wiring requirements and 2 board construction, it never made it as a product but you can make your own as we’ve got everything on GitHub. We do have a battery gauge available for the DMG. Another user has made their own for the GBA SP.
AdvanceLCD Prototype
As the AdvanceVGA project had been successful it was time to work on the AdvanceLCD 7″ project. Since the LCD I choose could accept a TTL signal (which has V/Hsync) it’s very similar to VGA so after a little bit, it was up and working. I was using the controller board that came with the LCD to provide the power so the next step is to make that board myself.
ClockxControl
One of our discord users was looking into buying a clock control module for the GBA, it was quite large and a little bit expensive. We made our own version, one that could allow for any clock speed you wanted (for an additional cost) and it supports the DMG, GBC and GBA.
As this is my 200th post (excludes some posts which I didn’t count), I thought I would do something just for fun/just because I can 🙂
I acquired have 6 loud fans from a server a little while back and have been trying to figure out what to do with them so I’ve built a kind of wind tunnel by using a cardboard box to mount the fans, bubble wrap with some cardboard for support and some bubble wrap on the top to seal most of it off (would have been nice if it was all see through from the outside).
Now add some small pieces of paper and we have a little tornado, it works but the papers do settle down the bottom most of the time.
Over the years I have collected hard drives, most of them a failing and were going to be thrown out but I kept them and thought what would it sound like for all of them to power up at once?
Well I’ve got 40 hard drives on 5 ATX power supplies (it was 4 before but 1 was too overloaded when starting up), so now we know!
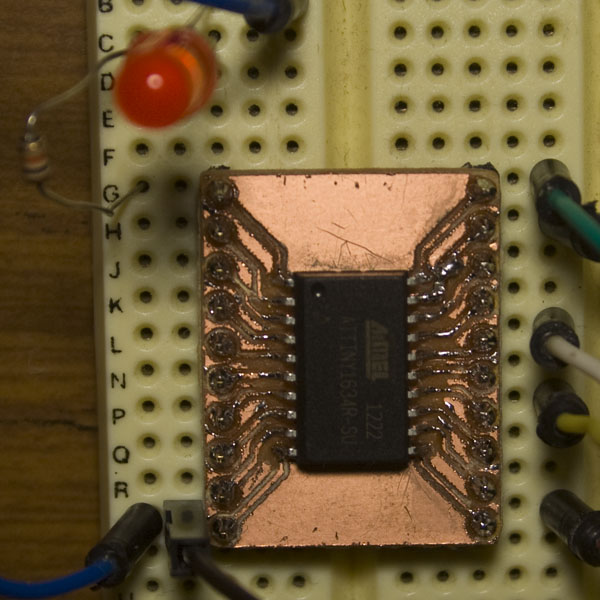
Just a quick post that I’d would be good to mention – If you’re like me and still using WinAVR 20100110, you’ll know it hasn’t been updated for a long time, but what if you want support for the new MCUs like the ATtiny1634? It’s quite simple, just follow the steps below.
Delete all folders in C:\WinAVR-20100110 except for the folders pn and utils
Copy all the subfolders found in C:\Program Files\Atmel\Atmel Studio 6.0\extensions\Atmel\AVRGCC\3.4.0.65\AVRToolchain to C:\WinAVR-20100110
Extract the two files from the AVRDude zip file to C:\WinAVR-20100110\bin
Download this avrdude.conf file and replace the one in C:\WinAVR-20100110\bin (otherwise you will have issues programming the ATtiny1634, fix was taken from this post)
Looks good, here’s the ATtiny1634_Test program I’m using to blink the LED with the watchdog timer.
About 1-2 weeks ago I bought a cheap power adapter with an output as a USB connector from Ebay which says it does 5V @ 1000mA. I would be drawing about 500mA – 700mA from it.
I’ve heard about bad stories about cheap power adapters (the “one hung low” kind) and straight away measured the voltage output and it did seem to be at 5V. I used the USB cable provided which I found to be terrible – it had a voltage drop of 2V – threw it out straight away.
For a few days the adapter seemed to work – then all of a sudden I heard a pop.
It looks like the resistor had fried and lost it’s connection.
On closer inspection, a diode lost it’s connection too.
I’m now using an Apple charger which is rated at 2A so I should be good now.
Element14 has given me another opportunity to review a product from their website, this time I chose the Element14 XL_STAR Development Board which is based on the Freescale MC9S08MM128 MCU that can run at 48MHz and has 128K flash, 12K RAM, 16-bit ADC, 47 I/O pins, SPI, DAC, RTC, to name a few features.
The XL_STAR’s main feature is the interaction between a 3-axis Freescale MMA8451Q accelerometer and an assortment of 48 LEDs around the accelerometer. This allows you to easily prototype ideas for your project ideas that which involve a 3-axis accelerometer.
I was given the chance by the kind folks at Element14 to select a part from their website and do a review on it. I chose the Olimexino STM32 board as it’s the next step up from the Arduino and can act similar to an Arduino. The Olimexino STM32 uses an ARM microprocessor running at 72MHz which is 4.5 times faster than the Arduino’s 16MHz. You can find the Olimexino range of products at http://au.element14.com/olimex/.
It has the following key features packed into the one board, to see more of the features click here.
– Allows 9V to 30V input
– microSD card capability
– Ability to use and recharge a Li-Ion battery
– ARM 32-bit processor with 128K flash, 20K SRAM, 12-bit ADC, 16-bit PWM, 39 I/O pins, SPI, i2C, CAN, RTC, etc
Note: The ARM micro doesn’t feature an EEPROM like AVR micros do.
As the Olimexino STM32 is based on Maple (or seems to be) we can use the Maple’s IDE (which is a re-brand of the Arduino’s IDE) to start writing and uploading code with ease, most Arduino functions have been ported to the IDE. We have the blinking LED sketch shown below.
In this blog I’ll show you tear downs of various gadgets (e.g. routers, TV tuners, etc) that I can grab my hands on; most if not all will be old gadgets. The tear downs will show various pictures and (try to) identify the main components.
I have a basic understanding of electronics so don’t expect the tear downs to be too much in depth 🙂
It’s always good to show the inside workings of electronic devices 🙂
AdvanceVGA – Play your GBA on the big screen! Swap out the LCD for our board, solder some wires, connect 5V USB and VGA and you’re ready to go.
GBxCart RW allows you to backup GB/GBC/GBA ROMs, save or restore game saves and re-write supported flash carts. Mini RW option available for GB/GBC only.
Wireless Gameboy Controller – Use your Gameboy, mGB, GBC, GBA, GBA SP, GB Micro, NDS and NDS Lite as a wireless controller on Windows, Linux, Raspberry Pi, etc, and on your NES, SNES, N64, Gamecube and Wii.