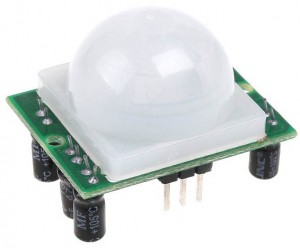
I’ve decided that I’ll use the PIR sensor I bought from Ebay for $2 as a front door detector to detect anyone approaching the front door, sometimes people don’t ring the doorbell and knock instead (hard to hear sometimes) or a courier drops off a package at the front door. The idea is to have a small box powered by a battery to send the signal via Wifi to a receiver which can have an LED/Buzzer.
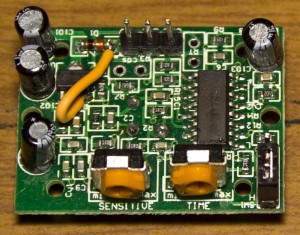
The PIR has an input voltage of 4.5 to 20V, has adjustable pots for sensitivity and time and has an output that goes high when the PIR detects something, it also has the BISS0001 chip that’s present on the Alarm PIR sensor which I have.
Current consumption at idle when at 9V is about 60uA which isn’t bad but I’d rather not use a 9V battery due to the size. I checked the output of the regulator which was 3.3 volts so I decided to wire the regulator’s output to the pin VCC input so it would bypass the regulator.
I found that using a 3V coin cell didn’t cut it and switched over to a 3.7V LiPoly which sits at 55uA at idle so I can use this directly for the MCU and use a diode to drop it down to 3V – 3.5V for the nRF24L01 (I forgot about the nRF24L01 3.6V max Vcc and had it running from the 3.7V LiPoly for a few days, oops!).
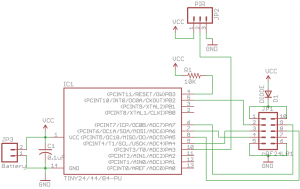
Since we’ve used the nRF24L01 before it’s very easy for us to transmit a small packet to the receiver when the PIR goes high and since this is such a simple application I won’t use any SHA1/random number generation like I did with the Alarm system PIRs. The receiver would have the same schematic except for the PIR detect pin it would have the LED/Buzzer.
Transmitter code
// Power down the nRF24L01
POWERDOWN;

// Sleep until a pin change or watchdog wakes us up
system_sleep();
turnOffwatchdog();

// Check if the PIR output is high
if (PINA & (1<<pirPin)) {
  // Power up the nRF24L01
  TX_POWERUP;
  _delay_ms(3);

  // Let server know the PIR was triggered
  mirf_transmit_data();
}

// Turn on the watchdog timer to re-check again in 4 seconds because the PIR output will still be high if movement
// is still being detected
setup_watchdog(T4S);
For the transmitting side we sleep until either a pin change is detected or the 4 second watchdog wakes us up. If the pin is read high we transmit the data “pir1c”. With the PIR if movement is continually detected the pin stays high so we use the watchdog to wake us up and keep checking if the pin is high.
Receiver code
// Enable Timer1 overflow (for the 4 second count)
sbi(TIMSK1, TOIE1);

while(1) {
  RX_POWERUP;
  mirf_CSN_lo;
  spi_transfer(FLUSH_RX);
  mirf_CSN_hi;
  mirf_CE_hi; // Start listening

  // Wait for incoming requests
  while (!(mirf_status() & (1<<RX_DR))) {
    _delay_us(250);
  }
  mirf_CE_lo; // Stop listening

  // Read the data received
  mirf_receive_data();

  // Check if the data_in matches "pir1c"
  if (memcmp(data_in, "pir1c", 5) == 0) {
    PORTA |= (1<<PA3); // Turn on LED

    // Start/Restart the 4 second count
    TCNT1 = 0;
    TCCR1B = ((1<<CS11) | (1<<CS10));
    }
  }
}

ISR(TIM1_OVF_vect) {
  PORTA &= ~(1<<PA3); // Turn off LED/Buzzer
  TCCR1B = 0; // Turn off Timer
}
As usual we wait until a request is received, read the data and check if it matches “pir1c”. If it does we turn on the LED and start the timer with a 4 second overflow. If we receive another request from the PIR when the LED is still on, our timer is reset and we count to 4 seconds again.
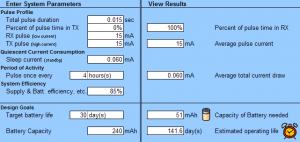
The battery life is about 141 days which isn’t too bad.
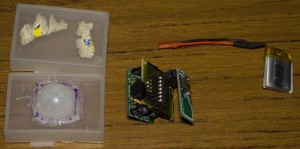
I was able to make the PCB small enough to fit a small plastic container I had. It seems to work well at night but during the day it can be a bit too sensitive and trigger when no one is around. After moving it to a better position where it’s sort of out of sight and lowering the sensitivity it now works well. Download PIR_Wifi_Sensor_v0.1


You might be able to do away with the battery and power it from the doorbell. A lot of doorbells in the U.S. run from a 12V circuit.
Hi Mike,
what is the best way to achieve this? which resistor etc.
also is there a way provide a 2 terminal connector (that will work regardless of polarity) what components are needed here?
Thank you for your help
Ro
Can you please help me make this with 2 atmega8?
I tryed modify the project in avr studio with no luck…
Thank you
Hi,
Can you try installing WinAVR and use programmers notepad to open this project?
What error messages do you receive? Did you change the pins I defined to suit the ATmega8?
Thank you for fast answer.
I tried both avr studio and winavr it was fine if attiny24 was in the makefile. If i change to atmega8 i got a lot of “undeclared (first use in this function)” messages. I tried to change the pins but seem to be some problem with spi.
After a many many hours of search of internet i can’t find a working example for atmega8 and nRF24L01.
Can you please make me an atmega8 version? It makes me very happy:)
I don’t have a atmega8 but try using this:
// SPI transfer 1 byte and return the result uint8_t spi_transfer(uint8_t data) { SPDR = data; while (!(SPSR & (1<<SPIF))); return SPDR; } // Initialise the SPI void spi_init(void) { DDRB |= (1<<PB2); // SPI CLK DDRB |= (1<<PB4); // SPI DO DDRB &= ~(1<<PB3); // SPI DI //PORTB |= (1<<PA6); // SPI DI SPCR = (1<<SPE)|(1<<MSTR)|(1<<SPR0); }Hello,
you can post the solution RX with Arduino UNO r3?
Hi,
I have the same pir. Could you please me to bypass the inside pir regulator in order to use pir at 3,3v connected to a xbee transmitter.
How to bypass this regulator, could you provide a picture to show how to sold?
Thanks
Best regards
Hi Benoit,
Here is a picture with the mod done – https://www.insidegadgets.com/wp-content/uploads/2014/12/IMG_0593_1.jpg
I found if the voltage drops too low then the PIR can just automatically trigger so you should test that out too.
Hi, are you using arduino Ide for coding? Is this code valid for arduino nano
Hi, not using the Arduino IDE but some of the code may still work on it