You might already know that it’s possible to backup your Gameboy camera’s memory to a save file and extract the images / convert them to BMP using a program called GBCameraDump. I had a request from a user asking if there was a way to automate this whole process. There are products which I didn’t know about such as the BitBoy which saves the images to SD card without a PC which is very handy if you use the GB camera very frequently as it can only store 30 images.
I took a look into this request as automating it could make it be as simple as plug in GBxCart RW with the GB camera, run a single file and it’ll do the rest. First thing was to take a look at the source of GBCameraDump, the author mentioned that GBCameraPic.cpp was the important file to look at. I was hoping at first that there might be an way to easily convert this GUI program into a command line program so I could call it after dumping the save game.
void __fastcall TGBCameraPic::DrawPic(int Number)
{
    int count=(Number+1)* 0x1000;
    for (int y=0;y<14;y++)
    {
    for (int x=0;x<16;x++)
    {
		for (int row=0;row<8;row++)
		{
 			Byte temp1=SaveRam[count++];
        	Byte temp2=SaveRam[count++];
        	for (int pixel=7;pixel>=0;pixel--)
        	{
                Picture->Canvas->Pixels[(x*8)+pixel][(y*8)+row]=Clr[(Byte)((temp1 & 1)+((temp2 & 1)*2))];
        		temp1>>=1;
            	temp2>>=1;
        	}
    	}
     }
     }
     Canvas->Draw(0,0,Picture);
}
It looks like the images in the save file start at 0x2000 and are in multiples of 0x1000. The source didn’t look too complicated however it appears that they are using the Bitmap library (TBitmap) which seems to be included in the compiler they used Borland Cbuilder5 (found by opening the .obj file).
I was starting to take a look at this all and my options, I started thinking that it’s just a BMP file, surely I could just figure it out without a library right? So I started to play around with the BMP files that GBCameraDump created and the GB camera save files too, changing one bit here, noticing what changed, changing another bit there, etc, here’s my findings –
BMP File
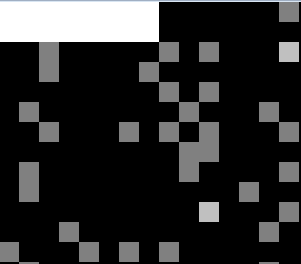
Lets take this BMP picture as an example –


The bitmap image contains a header which stores information such as width, height, bits per pixel, image size, etc to name a few. All the pixel data in our case for an 4 bit pixel depth starts at 0x76. The bitmap header will always be the same for every image created as well as the file size too so we could store this header in an array.
| Before | After |
 |
 |
We can see 4 common numbers repeat, 0, 7, 8, F, so lets change the byte at 0x76 from 0x00 to be 0xF0 and see what changes. Looking at the bottom left of the image, it looks like we changed a single pixel from black to white. Trying 7 changes it to grey and 8 changes it to silver; that’s all the colours that a GB camera image file produces and we know that each nibble (4 bits) equates to 1 pixel.

Lets try changing multiple bytes to 0 (black) to see how the image is formed, after a lot of 0’s, we can see that it goes bottom left to bottom right and then moves 1 pixel up and starts left to right again; we now have everything we need to know about the bitmap file.
Save File
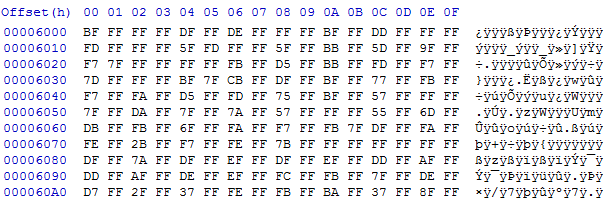
Moving on to the save file, the picture on my GB camera is the 5th one so we should start at 0x6000. It seems like the format might not be a simple as the bitmap format as there are lots of different values however there does seem to be lots of 0xFFs, this would likely be black.
| Before | After |
 |
 |
So lets start changing bits like we did before, lets change the byte at 0x6000 from 0xBF to 0xFF. It looks like the top left location (pixel 2) has changed from grey to black.
Lets try changing it from 0xFF to 0x00. This has done a pretty big change, changed 8 pixels to grey which where previously black.
Lets change the next byte 0xFF to 0x00. Now the 8 pixels have changed to all white.
After a bit more testing it appears that the 8 pixels colour is represented in 2 bytes. The first byte stores whether the pixel is white (0) or silver (1) and the second byte stores whether the pixel is white (0), grey (1, if the bit in the first byte is 0) and black (1, if the bit in the first byte is 1).
If we take the original 2 bytes at 0x5000 (0xBF and 0xFF) the bits are:
1011 1111
1111 1111
The top left pixel is black because both the 7th bits are one (MSB first). The next pixel is grey because the first byte bit is 0 and the second byte bit is 1.
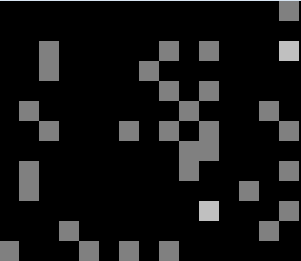
Now lets see what happens if we change 4 bytes to 0x00; it looks like it wraps around to the next line.
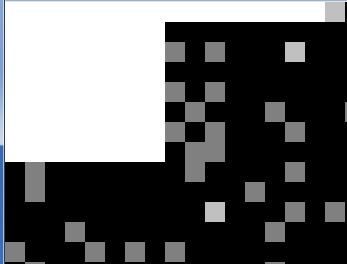
Lets do a whole bunch more 0x00s; it appears to be doing blocks of 8×8 pixels every 16 bytes (0x10).
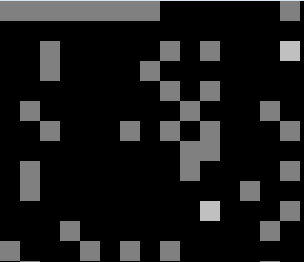
We’ve got a bit of a problem, the bitmap file goes bottom left to right and advances 1 line upwards where as the GB camera save goes top left to right in an 8×8 block format and once all 8×8 blocks are completed for the line it advances 8 lines downwards; we have to get these in sync somehow.
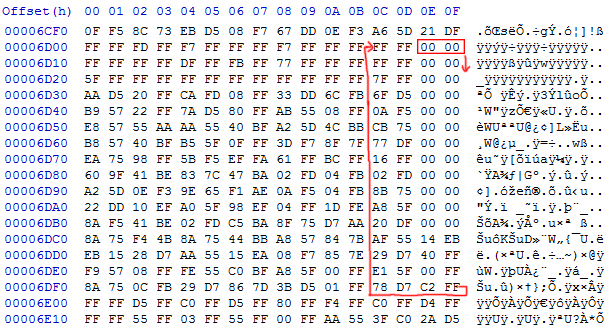
If we start off from 0x6D0E (close to the end of the image on the save), read 2 bytes and go downwards by 16 bytes we will start from the bottom left, move to the right by 8 pixels until we hit the end (0x6DF0) and then go to 0x6D0C and do the same thing. I’ve change the first few bytes to 0x00 and the image above shows a single line of white pixels going bottom left to right so it’s solved.

We could read all the images even deleted ones as deleting them doesn’t remove any of the image contents on the memory but that’s kind of unnecessary. I played around with the GB camera to see what actually changes when removing a pictures and it appears that the list of active photos starts at 0x11B2. Each byte corresponds to an image, 1st image – 00 maps to 0x2000, 2nd image – 01 maps to 0x3000, you can see that the next byte which should be mapping to 0x4000 is 0xFF which means the image was deleted so the GB camera would skip that one from the image viewer, then it goes to the 4th image – 03 to map at 0x6000 (locations don’t change).
// Locate which photos aren't marked as deleted
uint16_t activePhotosLocation = 0x11B2;
uint8_t activePhotosReadCount = 0x1E;
uint8_t activePhotos[30];

FILE *saveFile = fopen(savFilename, "rb");
fseek(saveFile, activePhotosLocation, SEEK_SET);
fread(activePhotos, 1, activePhotosReadCount, saveFile);
fclose(saveFile);

// Only save photos which are actively showing (i.e not marked as 0xFF)
uint8_t saveName = 1;
for (uint8_t x = 0; x < 30; x++) {
	if (activePhotos[x] != 0xFF) {
		uint32_t startLocation = (x * 0x1000) + 0x2000;
		uint16_t startReadCount = 3584;

		// Read save file
		FILE *saveFile = fopen(savFilename, "rb");
		fseek(saveFile, startLocation, SEEK_SET);
		fread(savBuffer, 1, startReadCount, saveFile);
		fclose(saveFile);

		// Write to BMP
		char bmpName[60];
		sprintf(bmpName, "%s\\%i.bmp", timebuffer, saveName);
		save_to_bmp(bmpName);
		saveName++;
	}
}
Firstly we read the location of active images to see which ones we should convert and store them in an array, any that don’t read 0xFF we will extract. We read 3584 bytes of the save file in the right location starting at 0x2000, call the bmp saving function and loop this 30 times for the 30 pictures (if they are active).
FILE *bmpFile = fopen(filename, "wb");
fwrite(bmpStart, 1, 0x76, bmpFile); // Write start of BMP file

int currentByte = 0xD0E;

// 14 vertical blocks of 8 x 8 pixels
for (uint8_t v = 0; v < 14; v++) {

	// 8 Lines
	for (uint8_t l = 0; l < 8; l++) {

		// One line
		for (uint8_t x = 0; x < 16; x++) {
			uint8_t pixelsWhiteSilver = savBuffer[currentByte];
			uint8_t pixelsGreyBlack = savBuffer[currentByte+1];

			uint8_t eightPixels[4];
			uint8_t epCounter = 0;
			uint8_t tempByte = 0;

			for (int8_t p = 7; p >= 0; p--) {
				// 8 bit BMP colour depth, each nibble is 1 pixel
				if ((pixelsWhiteSilver & 1<<p) && (pixelsGreyBlack & 1<<p)) {
					tempByte |= 0x00; // Black
				}
				else if (pixelsWhiteSilver & 1<<p) {
					tempByte |= 0x08; // Silver
				}
				else if (pixelsGreyBlack & 1<<p) {
					tempByte |= 0x07; // Grey
				}
				else {
					tempByte |= 0x0F; // White
				}

				if (p % 2 == 0) {
					eightPixels[epCounter] = tempByte;
					epCounter++;
					tempByte = 0; // Reset byte
				}
				else {
					tempByte <<= 4;
				}
			}
			fwrite(eightPixels, 1, 4, bmpFile);
			currentByte += 0x10;
		}
		currentByte -= 0x102;
	}
	currentByte -= 0xF0;
}
We write the bitmap header bytes that we stored in an array and then jump to 0xD0E in our save game buffer. For every 16 bytes (1 line), we read 2 bytes at a time and go through bit by bit to determine which pixel is which colour.
When processing the colour, for the odd bits, we store them in the temporary variable, shift them left 4 times as they will be the first nibble of the byte. Then on next run of the loop, that’s when the OR really does it’s job to put the next pixels data into the same variable, we store that byte in our array and write it to disk after 8 pixels are done.
We add 16 bytes (0x10) from our position once 8 pixels have been read until we have finished reading 32 bytes when we jump back to the next column (0x6D0C). Once 8 x 8 blocks x 8 lines have been read, we need to jump back a bit more to bring us to the next 8 x 8 block of 8 lines to read (0x6C0E) and so on.
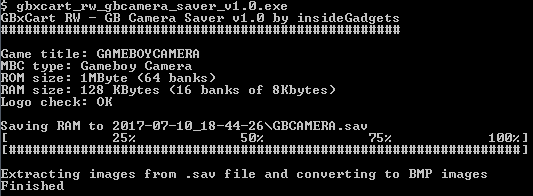
I’ve made this it’s own program so that you can do a one click and it will do the rest. It will create a folder with today’s date/time, backup the save file, store it in the folder then extract the 30 images and save it in the folder.
Download GBxCart_RW_GBCamera_Saver_v1.0


FANTASTIC !
Can you provide an .exe able to just extract the pictures from a .sav file without connecting to the serial device please ?
Hi Andrew,
Sure, please give this one a go, you can drag and drop the .sav file to it: https://www.insidegadgets.com/wp-content/uploads/2018/07/GBxCart_RW_GBCamera_Saver_v1.3_Drag_and_Drop.zip
Could this be done in reverse order?
I’m looking to inject images into a GameBoy Camera and not take them out.
Even just providing the byte sequence for manual insertion via hex editing or 17 hours worth of typing in GameShark codes would be good.
Hi,
is it only for windows ?
I tried to compile it, but it doesn’t work.
Hi, try compiling a newer version found here: https://shop.insidegadgets.com/wp-content/uploads/2018/05/GBxCart_RW_GBCamera_Saver_v1.8.zip