As you can see the blog hasn’t been updated in quite a bit of time and most of the previous posts have been about the GameBoy. We’ve had a bit of free time on our hands so have been busy working on projects and mods (most of which can be listed in our shop) but since starting up our Discord server, it’s easier to post real time updates there than writing up entries on the blog which can take a few hours at a minimum. A few ideas have come from the users there and users can talk about their own projects too.
So let’s have a look at the projects and mods we’ve worked on!
AdvanceVGA

After playing around with the GBA LCD, I wanted to make a GBA handheld with a 7″ LCD screen (that accepts TTL) with our own LCD voltage control board but before that it made sense to try outputting it to a VGA monitor first. It was the first time I ever needed to use an FPGA and went with the Intel 10M02 because it ran off a single 3.3V rail, had a PLL, was a QFP package and didn’t need an external EEPROM. It did take a while to complete, it started off with using an SRAM but using a circular buffer the 10M02 had just enough internal RAM to make it work, timing was pretty tight. We added a wireless GBC receiver so it can also be played with our wireless GBC TX carts.
LiPo Battery Gauge for the GBA
Having a 2 colour LED for the GBA battery is alright but why not have more so you can see the exact state. This was the idea with the LiPo Battery Gauge project by using a clear GBA shell we could fit in quite a bit of LEDs in the front. Due to the wiring requirements and 2 board construction, it never made it as a product but you can make your own as we’ve got everything on GitHub. We do have a battery gauge available for the DMG. Another user has made their own for the GBA SP.
AdvanceLCD Prototype
As the AdvanceVGA project had been successful it was time to work on the AdvanceLCD 7″ project. Since the LCD I choose could accept a TTL signal (which has V/Hsync) it’s very similar to VGA so after a little bit, it was up and working. I was using the controller board that came with the LCD to provide the power so the next step is to make that board myself.
ClockxControl
One of our discord users was looking into buying a clock control module for the GBA, it was quite large and a little bit expensive. We made our own version, one that could allow for any clock speed you wanted (for an additional cost) and it supports the DMG, GBC and GBA.
Custom Boot Logo Flash Cart
Another request from one of our users, a custom boot logo flash cart. Initially it worked with the GBA but didn’t work for the DMG/Pocket but we found out that the DMG/Pocket reads the logo first to display it and then verifies it where as the GBC and GBA 40pin does the opposite. Unfortunately devices older than the GBA 32pin, GBA SP, etc only reads the logo once.
Custom AGB Board
A bit after the AdvanceLCD prototype, somehow on the discord server we got the idea to make a custom board for the GBA. We would harvest the GBA AGB chip, memory and the crystal. Luckily there was an Eagle Library from ArcadeTV which had the schematic and footprints, all we had to do was layout the board, remove the parts we didn’t need like the LCD control chips/audio chips and hope for the best! We’d hook it up to AdvanceVGA because all it needed was the data lines and it worked!
AdvanceLCD v1
Amidst everything, we were continuing to work on this project. The plays to make a handheld GBA were scrapped due to the poor quality of 3D prints so we went with a standalone unit instead and added features to it like wireless control, stereo speakers, LCD brightness and volume control, VGA out and a 10Ah LiPo battery which could potentially make it last for 24 hours of play time! Put an acrylic clear top on it, spray painted it black and we were ready to play!
GBxMAS RW Edition
Yet another user request but they didn’t realise we would actually end up making it! We made a XMAS themed GBxCart with red and green LEDs with the PCB shaped like a Christmas tree. Since the ATmega8515 didn’t have enough pins, we added a ATmega169 to be the LED controller which is hooked up to the UART RX line so it only accepts special commands and the ATmega8515 is programmed to ignore those commands. We had a bit of fun with the animations.
Gameboy Micro LCD in a GBA project
We joked about the idea to stick a GBM LCD in a GBA as the signals were likely going to be the same, luckily one our Discord users found the datasheet for the GBM LCD and it did have the same signals just different LCD voltages. The first prototype was successful and we’ve just released the GBA-M LCD Adapter board recently.
RGB Battery Indicator and Blinking LED Indicator
Just a two small projects that came from user suggestions, one is an RGB Battery Indicator for the DMG, Pocket and GBC which is useful so you can have a battery indicator light that changes from red, blue and green depending on the battery voltage. Initially I was looking at flex boards for the Pocket/GBC version but didn’t have much luck when trying to solder/program the ATtiny13 QFN chip, we’ve just gone with 0.8mm boards (coming soon).
The other is a simpler mod that just blinks the LED when the battery voltage is low which can be set by the user.
Wireless GBA TX cart with Rumble mod
One of our users was asking about having rumble feedback for the GBA TX cart when paired with the Gamecube. After a bit of testing, there was enough room to fit in a very small motor which the MCU controls and we added 2 way communication with the nRF24 wireless modules.
Hot swapping AA batteries, GBA Macro Record and Play, GBA Auto Fire and VU Meter
Quite a few little projects/mods here. By adding a single chip and an internal LiPo battery, we could allow for hot swapping AA batteries while keeping the GBA running.
By re-using the Wireless GBA RX board we made, we could read the key presses, store them to the internal EEPROM and play them back when a certain button combo was pressed. There wasn’t much room so an external EEPROM or SRAM chip would be useful to add.
There are a few select games that require you to keep tapping a button to fire, so we made a flex board which went in-between the button and the PCB so you wouldn’t have to cut any traces. Once the button is held, it goes to the ATtiny which then sends a high/low signal to the button we wired up to it.
Another user idea was a VU Meter which wasn’t too difficult to implement, we re-used the LiPo Battery Gauge board. Initially we went with measuring the digital audio signal length from the GBA directly but that only seemed to work well for GBA games. In the end we went with a simple ADC compare of the audio signal.
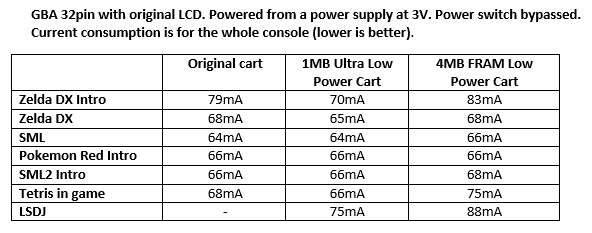
Ultra Low Power Flash Cart using GreenPAK technology
We were looking at making an MBC3 cart which could support a 4MB flash chip because only MBC30 supports 4MB where as MBC3 supports 2MB max. The initial idea was to do this with logic but the logic chips cost and space started to add up. One of our discord users mentioned the GreenPAK device. Once I saw and understood what it could do, I was hooked! And it seemed to be pretty low power too, this could be the end of needing to use a CPLD for a 5V flash cart for me at least.
It’s a one time programmable logic device (50c each) with LUTs, DFF/Latches, counters/delays and lots of other features such as an ADC, DAC, SPI, PGA (but some these seem a bit trickier to use) and some come in a TSSOP-20 package. It also lets you emulate the device instead of programming it so you can hook it up to your circuit and see if it performs as you think it should. The plan to make a flash cart with GreenPAK started then and there.
I was able to draw the logic using the simple GUI and came up with 1 chip for the ROM and 1 for the SRAM. I gave the ROM a try and it worked first go! The SRAM also worked first go but needed a bit of a change to work with the DMG/Pocket.
It does seem to match the power consumption of a regular Gameboy cartridge and is even lower power than them when the CPU is under load! Check out the 1MB Ultra Low Power Flash Cart which is coming out very soon. The regular 1MB CPLD cart takes at least 30mA+ more depending on the MBC selected. I think we might be the first ones to release a GreenPAK based Gameboy cartridge!
Other Gameboy / GBA Flash Carts
Speaking of flash carts, we added a few more flash carts to our shop.
Gameboy 512KB Logic Based Flash Cart
Gameboy 32KB ROM, 4KB FRAM Flash Cart – Great for Tetris high score patch
Gameboy 32KB FROM Cart – Using an 32KB FRAM chip for the ROM, you can write to it too from your own 32KB game but need to be careful.
Gameboy 32KBx15 Flash Cart – Switch between 15 slots of 32KB
GBA 32MB, 4Kbit/64Kbit EEPROM Save, Flash Cart
GBA 32MB, 256Kbit FRAM Save, Flash Cart
sGBA – Custom GBA board in a SNES Controller
One of our users mentioned a post on BitBuilt where someone had put a GBM inside an SNES controller. Of course we just had to give this a try ourselves and why not make a custom board out of it as we can harvest the AGB chip, etc like we did before and add in a GBM LCD too! We also added in the ClockxControl functionality, the RGB Battery LED mod and an audio chip this time with a small speaker. The first test was a success!
Now we had to spend the good part of a day to dremel and file down the SNES controller to make it fit, it actually came out better than I expected. Power consumption is about 50mA without the speaker but with it, it’s close to 100mA. Looking to add in a different audio chip so the volume can be controlled as currently it can’t be.
Our own GBC 101 Mod
Since the GBM LCD worked on the GBA, it would be nice to have the GBM LCD also work for the GBC and also see how difficult the GBC 101 mod actually is to make as it appears to just need a CPLD with a clock.
After playing around for a few hours, we were able to get something up and running! It’s a little glitchy but the proof of concept is there. Next we’ll change the CPLD to a low power one like the 5M80Z CPLD see how we go. It looks like to have the GBM LCD working as a proper product it would likely need a flex board so an actual finished product may be a no go at this stage, I’ll just do a regular PCB to test the concept.
And that brings you mostly up to date with all the projects/mods we’ve been working on, quite a lot when you look at it!


