Ever since I built my 4 bay 3.5″ NAS using the Raspberry Pi which was placed inside a Netgear NV NAS enclosure, I’ve been wanting to make a single bay NAS with a 2.5″ drive to use as a small file server or for backups. I’ve decided that I’ll use it for remote backups in which I’ll use rsync over SSH from my linux server to backup some of my data at night.
(sneak peak)
Due to my use case, I’ll need to have it operating 24×7 and don’t really have a need for an LCD or even power button, so it will be a minimalistic design. The Raspberry Pi was purchased from Element14 / Newark and this time it has mounting holes which will make things more easier for us. In terms for the power supply, I’m able to re-use an existing 5V 2A supply but otherwise I could have used my SMPS.
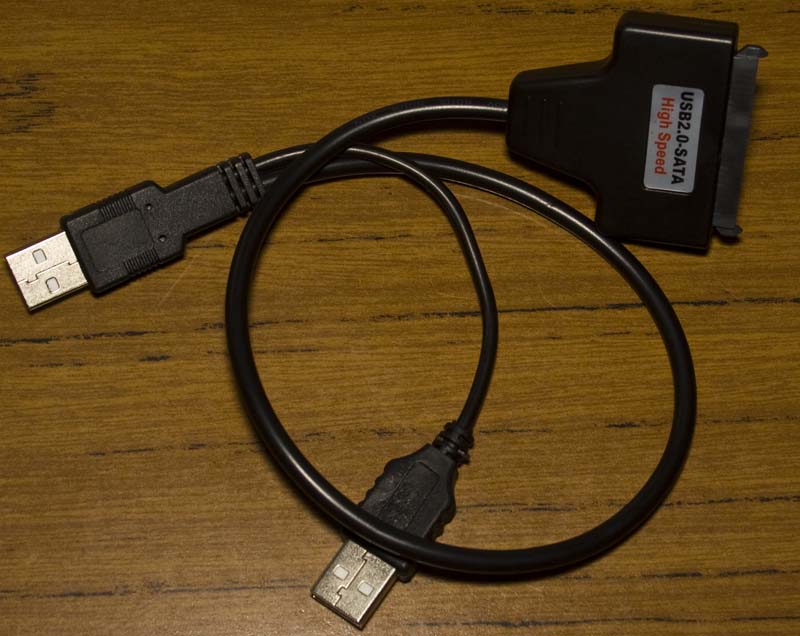
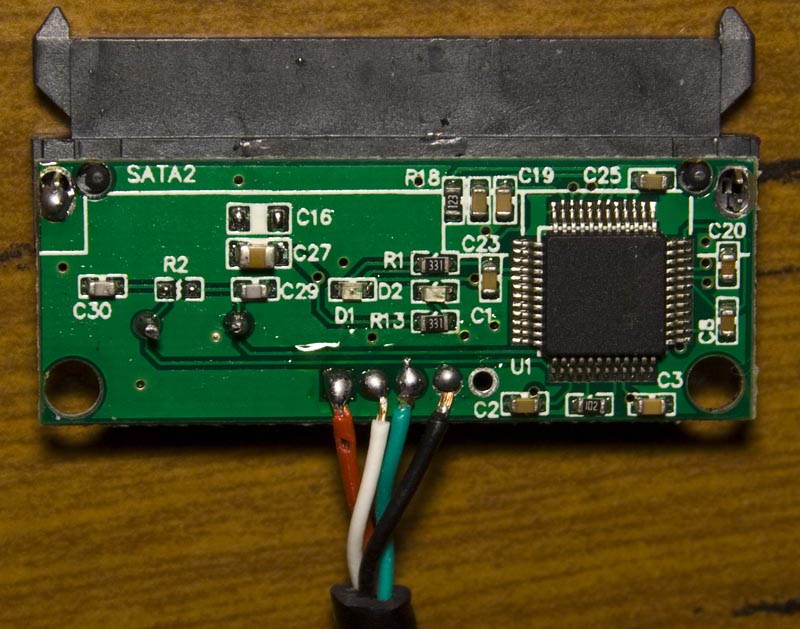
The SATA to USB adapter that I bought from Ebay was larger than I wanted so it’s time to make it smaller.
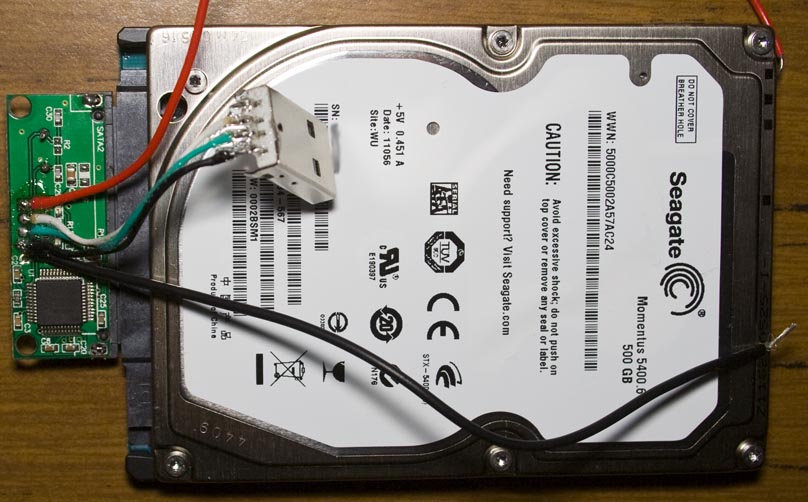
I went ahead, opened it up, shortened the USB cables, separated the power cable out (as I don’t want the Pi itself to power it), re-soldered the wires to a USB connector I had – it’s now more compact. As a side effect, this SATA adapter has quite a bright blue LED which illuminates through the acrylic case which gives it some colour. Just using a spare 500GB hard drive whilst testing.

Now that I have the hard drive base for the acrylic case, we can start putting it all together. I’ve glued down the DC jack, added a small slot cutout near the USB so that the SATA adapter’s cables will slide in there and have screwed in the Pi and hard drive to the acrylic panels.
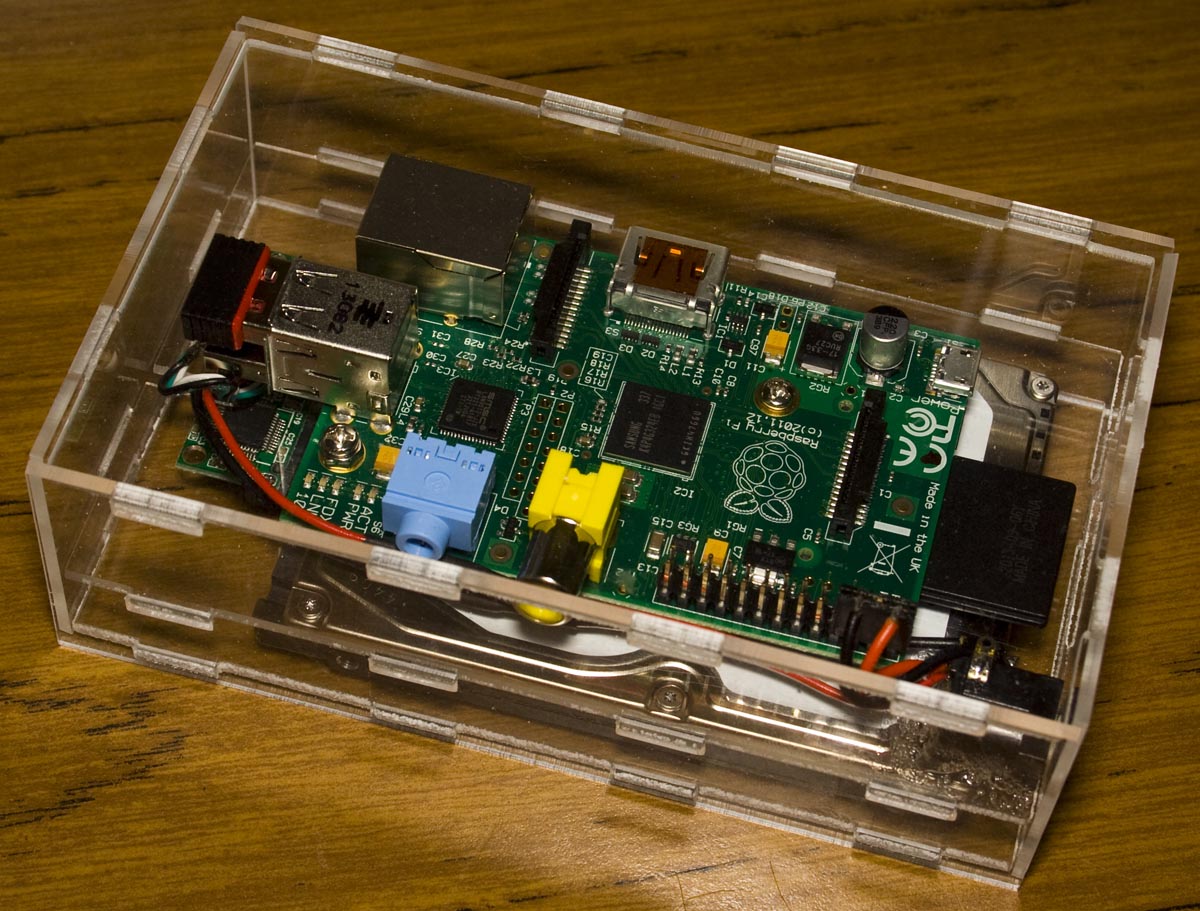
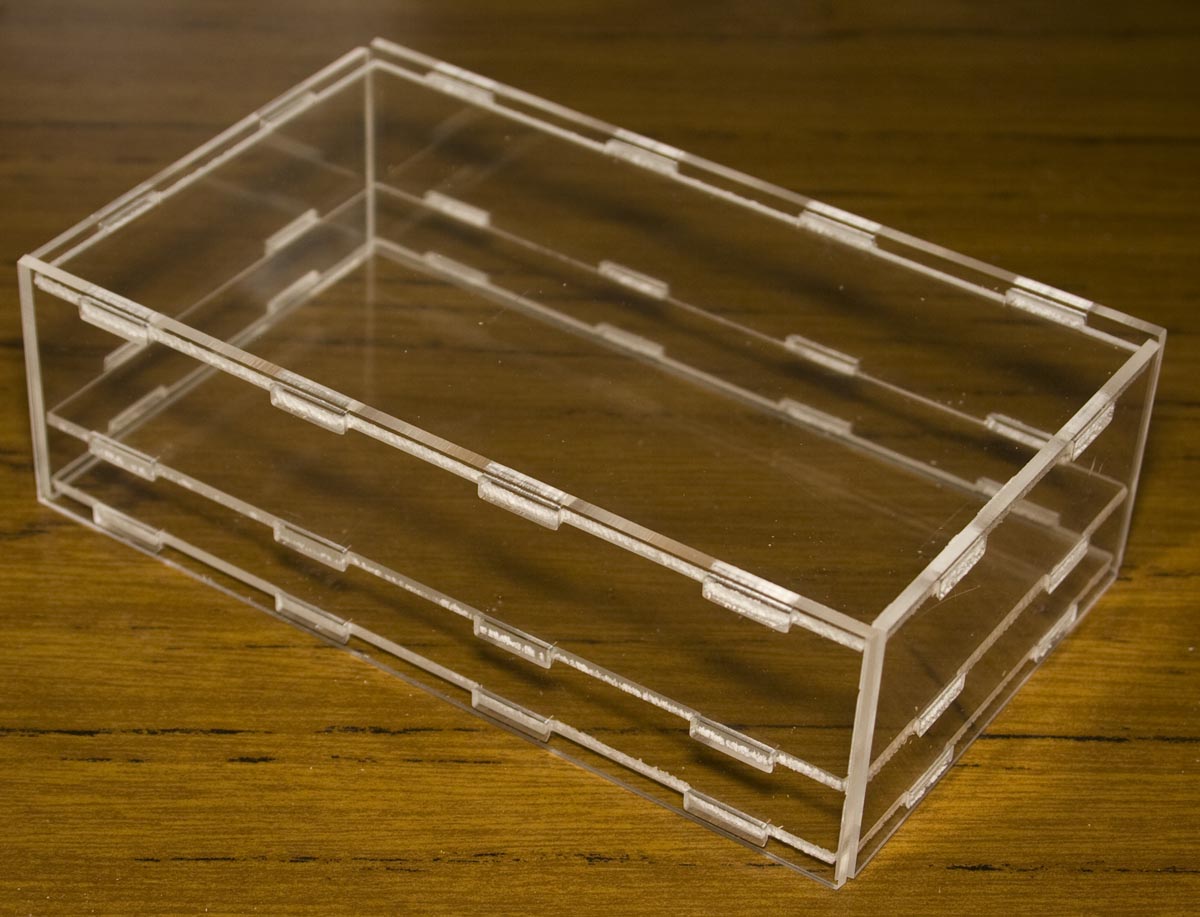
There’s 3 layers to this case and it all fits together pretty snug, maybe a little too tight between the bottom 2 layers, I’ve now added the USB Wifi adapter. The case measures 136mm x 82mm x 41mm and weighs 265g – it could possibly be reduced by 10-20mm on each side but I made it a little bigger just to be sure everything would fit. I may need to add some vent holes around the case to keep things a bit cooler. Now were’ ready for the software side of things.
Hard drive setup
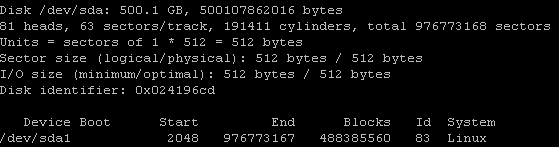
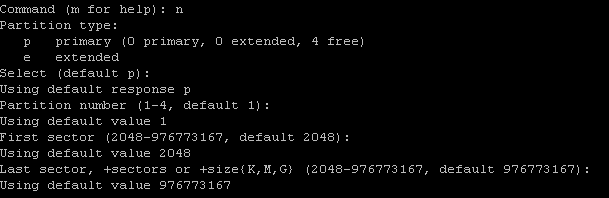
Once it’s all powered up, we connect via the LAN cable so we can setup the hard drive and the wireless later. I like to firstly install Webmin (sudo apt-get install webmin) to make things easier to manage later on. We list the disks by running sudo fdisk -l to list our disks and then run sudo fdisk /dev/sda to setup our primary partition.
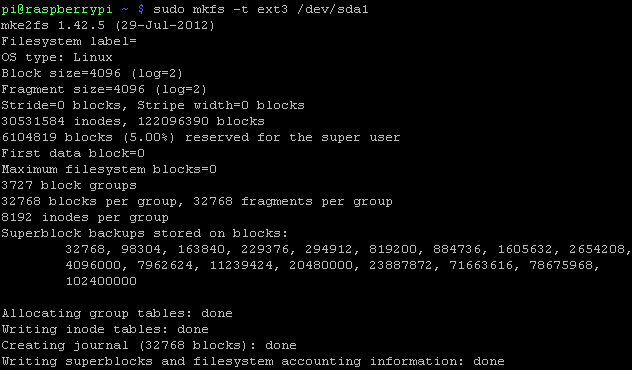
Next we make the filesystem on the primary partition we just created, I chose going with EXT3 and we run sudo mkfs -t ext3 /dev/sda1 which takes a few minutes to run.
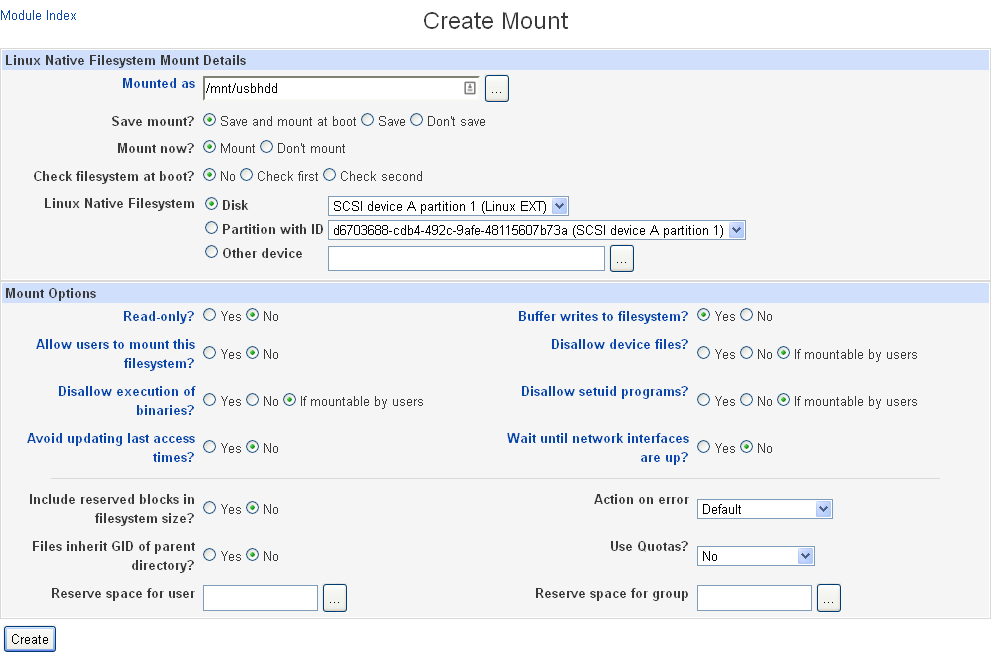
Using webmin we can choose to mount this file system on boot to /mnt/usbhdd (I created this mount point by running sudo mkdir /mnt/usbhdd).
Wireless setup
The wireless setup is straight forward using this guide, the RPi was able to detect my Wifi adapter automatically. In brief, we run sudo nano /etc/network/interfaces and in the wlan0 section we add in “wpa-roam /etc/wpa_supplicant/wpa_supplicant.conf”.
ctrl_interface=DIR=/var/run/wpa_supplicant GROUP=netdev
update_config=1

network={
        ssid="YourSSID"
        psk="password"
        key_mgmt=WPA-PSK
}
We modify the file by using sudo nano /etc/wpa_supplicant/wpa_supplicant.conf and make sure it matches the configuration above and changing the SSID and PSK password to suit your needs.
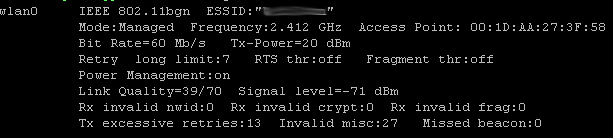
Reboot the RPi and you should be good to go, you can run iwconfig to see that it’s connected. When the RPi was in the same room as the router I got 2-3MB/s performance, when it was 2 rooms away it jumps around a little around 500 – 800KB/s sometimes and but usually stays around 1.4 – 1.8MB/s though this is only when the USB adapter was facing the router. If it wasn’t facing the router, at startup it didn’t connect to the wireless for me and you may experience some packet loss so a bit of testing/moving around is required for these adapters that don’t have a large antenna.
Rsync setup
Normally when you use rsync over SSH to connect, it prompts you for your password but as I’d like this to be setup as a scheduled task, we’ll need it to automatically authenticate us. Firstly either change your Pi password to something else than the default and/or create a different username. As I’ll be putting this up online, I want to use a different port other than port 22, so you can edit your /etc/ssh/sshd_config file and add another line to say Port xyz and just open this port on your router.
Run ssh-keygen on your linux server (assuming you haven’t run that previously) and press enter when it asks for a passphrase. Use ssh-copy-id -i ~/.ssh/id_rsa.pub 192.168.1.50 to copy your public key to the RPi, you will need to log in with your RPi credentials, then logoff. Now you can use ssh 192.168.1.50 and it shouldn’t prompt you for a password.
rsync -e “/usr/bin/ssh” –stats –progress -av `find /mnt/raid5/backups/ -name ‘*-cd*’ -or -name ‘*.spf’ -or -name ‘*.spk’` alex@192.168.1.50:/mnt/usbhdd
Now it’s all a matter of configuring rsync to meet our needs, here I’m having it locating all files with “-cd” or ending in “.spf” or “.spk” and then transferring them to the RPi to the /mnt/usbhdd directory. On our linux server, we can add this to the scheduled cron jobs to run at night.
And that’s all the software setup needed, it’s all ready to be deployed.


Thanks for posting these things. One of them came in handy for me.
Great article thanks. Did you make the acrylic case or did you buy it from a seller? It’s a great case and just what I am looking for.
Thanks
Andy
Hi Andy,
I made the case myself, here are the design files if you are interested:
http://www.insidegadgets.com/project/Cases/ (added one with slot cuts to allow for better airflow)
I would like to print this using a 3d printer, do you have stl or cad files available for this case?
Hi Mike,
Unfortunately I don’t have an STL or CAD file available as I used a CNC instead of a 3D printer.
Hi Alex,
You’ve did a great job, and it’s helping me a lot to do something similar.
I’m using the same 2.5″ drive, and I’m planning on using the same SATA Adapter that you used, could you please let me know the dimensions of the small circuit board you used ?? I want to make a case that fits perfect with the combination.
Here comes the pic of the circuit i need the dimensions.
https://www.insidegadgets.com/wp-content/uploads/2014/08/IMG_3698-300×235.jpg
Thx.
Hi Nicholas,
Unfortunately I no longer have the little NAS available to me, but the dimensions might be something like 41mm x 20mm.