From the last part, we looked at the design for the new GBxCartRead project which will read the Gameboy & Gameboy Advance ROM/RAM. For the data transfer between the PC and ATmega I went with the V-USB ATtiny85 method (for testing the communication method incase the USB to serial chip didn’t work) and was able to re-use some of the GBCartRead code to successfully read Gameboy cartridges though it was quite slow.

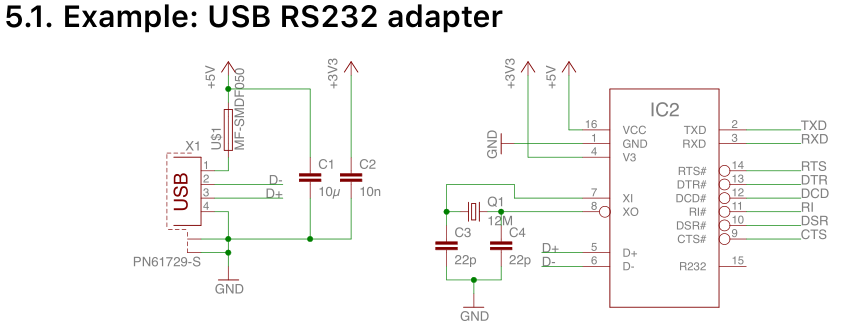
The faster method for data transfer is using a USB to serial converter chip like the CH340G, it will mean less parts overall and should result in a faster speed, if it works. The CH340G looks simple enough to control and hook up, it can be powered by 5V or 3.3V which is good for us as we’ll have to switch between the GB and GBA. It needs a 12MHz crystal, a few capacitors, a polyfuse (if you want), the USB+/- lines and the TX/RX lines, the other lines we can ignore.
I hooked it all up without the crystal capacitors (I usually do this with AVR chips and they work fine) but it didn’t work, only when I touched the crystal pins would it work, add in the 22pF capacitors and it works fine. I performed a quick loopback test at 1Mbps and that also passed. Now we just need to change a bit of our ATmega / PC code to work with it, I’ll be using the Teuniz RS-232 library like I did in GBCartRead. After a quick test, reading 128KB of ROM now only takes 4 seconds!
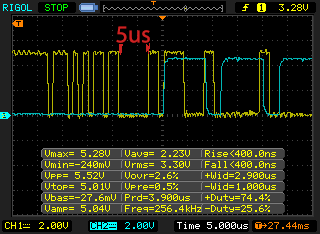
One thing we do need to be careful of is if the PC sends 64 bytes of data at once, the CH340G will dump all this data to the ATmega as quickly as possible, there is about 5uS of dead space where the ATmega can do something else (if you are curious the blue trace shows when the ATmega receives a USART packet and falls once the SRAM write is performed). Instead of doing the write command after each byte received when writing like I was doing, I will read all 64 bytes on the ATmega, perform the task and then send an acknowledge byte back.
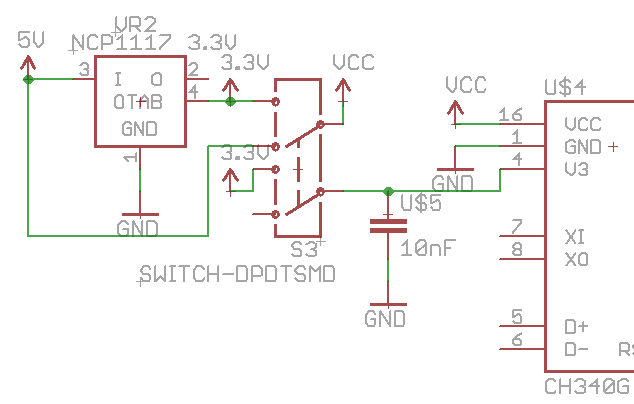
We also need a way to switch between 5V and 3.3V for all devices, for that we can use a DPDT switch which allows us to switch two different parts of the circuit and those poles are isolated from each other. By using the DPDT as above, we can switch VCC between 5V or 3V whilst switching V3 on the CH340G between nothing (as it generates 3.3V on it’s own when powered by 5V) or to the 3.3V rail. I did try just putting the capacitor and nothing else whilst powered by 3.3V and it generates 2,9V on the V3 line which does still work but I’d rather go with what the datasheet says we need to do.
Be careful when reprogramming the ATmega if you leave the GBA cartridge connected, you would need to remove it or use a switchable 5V or 3.3V programmer like the USBASP. I briefly used the 5V USBTinyISP without issues when the GBA carts but it was an accident on my part so I will always remove them before programming.
I have also been thinking of switching to the ATmega32A which is a little bit cheaper (on E14), smaller and it runs at 3.3V with 8MHz too so I’ll have to order some in.
void com_wait_for_ack (void) {
...
	while (rxBytes < 1) {
		rxBytes = RS232_PollComport(cport_nr, buffer, 1);
		if (rxBytes > 0) {
			if (buffer[0] == '1') {
				break;
			}
			rxBytes = 0;
...

void com_read_bytes (FILE *file, uint8_t count) {
...
	while (readBytes < count) {
		rxBytes = RS232_PollComport(cport_nr, buffer, 65);

		if (rxBytes > 0) {
			buffer[rxBytes] = 0;

			if (file == NULL) {
				memcpy(&readBuffer[readBytes], buffer, rxBytes);
			}
			else {
				fwrite(buffer, 1, rxBytes, file);
			}

			readBytes += rxBytes;
...

void com_write_bytes_from_file (uint8_t command, FILE *file, uint8_t count) {
	uint8_t buffer[65];

	buffer[0] = command;
	fread(&buffer[1], 1, count, file);
	RS232_SendBuf(cport_nr, buffer, (count+1)); // command + 64 bytes
Here’s a few COM port functions to make our life easier as this particular RS-232 library I’m using polls the COM port to receive data, so there is a chance that we won’t receive all the bytes we expect at once. The first function just waits until we receive a “1” byte back from the ATmega. The com_read_bytes function will read the number of bytes requested either to the global buffer or to a file, maximum is 64 bytes and the com_write_bytes_from_file function will send our command (like write to SRAM ‘w’) with 64 bytes of data from a file.
At this stage, you just have to select which Gameboy or GBA function from the PC interface program you’d like to choose from the list but later on it will all be integrated together.
GBA Reading ROM
void gba_set_24bit_address(uint32_t address) {
	GBA_PORT_ROM_ADDR23_16 = 0; // Set 0-23 address lines low and set as outputs
	GBA_PORT_ROM_ADDR15_8 = 0;
	GBA_PORT_ROM_ADDR7_0 = 0;
	GBA_DDR_ROM_ADDR23_16 = 0xFF;
	GBA_DDR_ROM_ADDR15_8 = 0xFF;
	GBA_DDR_ROM_ADDR7_0 = 0xFF;

	GBA_PORT_ROM_ADDR23_16 = (address >> 16);
	GBA_PORT_ROM_ADDR15_8 = (address >> 8);
	GBA_PORT_ROM_ADDR7_0 = (address & 0xFF);
}

uint16_t gba_read_16bit_data(uint32_t address) {
	gba_set_24bit_address(address);

	cs_mreqPin_low;
	GBA_PORT_ROM_ADDR15_8 = 0; // Set address lines low and set as inputs
	GBA_PORT_ROM_ADDR7_0 = 0;
	GBA_DDR_ROM_ADDR15_8 = 0;
	GBA_DDR_ROM_ADDR7_0 = 0;

	rdPin_low;
	asm volatile("nop");
	uint16_t data = (GBA_PIN_ROM_DATA15_8 << 8) | GBA_PIN_ROM_DATA7_0; // Read data
	rdPin_high;
	cs_mreqPin_high;

	return data;
}
Now on to reading the Gameboy Advance ROM, as we know there are 24 address lines and 16 of those become data lines which means we need to know when to turn some of those outputs to inputs. CE, RD, WR, CS2 should always be high when inactive. When we write to the address lines, we pull CE low so the ROM latches A0 to A15 so we can then turn A0 to A15 back into inputs and leave A16 to A23 as is. We set RD low, wait a tiny bit and then read the AD0 (A0) to AD15 (A15) inputs and combine them into a 16-bit variable to return at the end, we set RD high and CS high to end the read.
else if (receivedChar == 'r') {
	receivedChar = '1';
	while (receivedChar == '1') {
		for (uint8_t x = 0; x < 32; x++) {
			uint16_t dataRead = gba_read_16bit_data(address);

			// Low byte & High byte
			USART_Transmit(dataRead & 0xFF);
			USART_Transmit(dataRead >> 8);

			address++;
		}
		receivedChar = USART_Receive();
	}
}
The higher up loop looks like this, once we receive a lower case ‘r’ (most GBA functions are lower case to represent it’s a 3.3V function), we loop for 32 times because we read a 16-bit value which we will send as 2 bytes (=64 bytes), it turns out it’s low byte first then high byte and we increment the address by only 1 due to the same reason (16-bit value per address).
currAddr = 0x00000;
endAddr = romEndAddr;
set_number(currAddr, SET_START_ADDRESS);
set_mode(GBA_READ_ROM);

// Read data
while (currAddr < endAddr) {
	com_read_bytes(romFile, 64);
	currAddr += 64;

	// Request 64 bytes more
	if (currAddr < endAddr) {
		RS232_cputs(cport_nr, "1");
	}

	// Print progress
	print_progress(currAddr, 8192, 32768);
}
RS232_cputs(cport_nr, "0"); // Stop reading
On the PC side it looks pretty simplistic, we know the start/current address (0x0000), the end address, we send the start address to the ATmega, send the ‘r’ command and start reading the 64 bytes to a file, we’ll always get 64 bytes here and if we have more to do, we send a “1” for the ATmega to send us 64 bytes more. Once all bytes have been read we send a “0” to stop reading the ROM and that’s it.
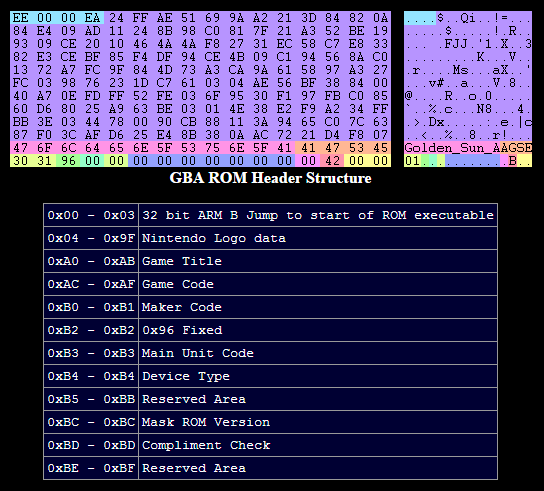
Now that we can read the ROM, we can read the Game title and also check the Nintendo logo matches like we did for the Gameboy Cartridges, most of it is the same code just changed a bit so no need to show it here.
GBA Reading/Writing SRAM
Reading and writing to SRAM is quite easy, it’s almost like on the Gameboy Cartridges except that we don’t have to bank switch, we need to pulse CS2 instead of CS and we write the address on A0-A15 and receive the data byte (8-bit) back on A16-A24 (on the GB these were called D0-D7). Reading Flash up to 512Kbit can be achieved the same way but writing is different (not cover here yet).
else if (receivedChar == 'm') {
	gb_mode(); // Set GB mode as it uses 16 bit address with 8 bit data
	receivedChar = '1';
	while (receivedChar == '1') {
		for (uint8_t x = 0; x < 64; x++) {
			USART_Transmit(gba_read_ram_8bit_data(address));
			address++;
		}
		receivedChar = USART_Receive();
	}
	gba_mode(); // Set back
}
...
uint8_t gba_read_ram_8bit_data(uint16_t address) {
	set_16bit_address(address);

	rdPin_low;
	cs2Pin_low; // CS2 pin low for SRAM/Flash select

	asm volatile("nop"); // Delay a little (minimum needed is 2)
	asm volatile("nop");
	uint8_t data = GBA_PIN_RAM_DATA7_0; // Read data

	cs2Pin_high;
	rdPin_high;

	return data;
}
As it’s so similar, we can change our mode to Gameboy mode (I have 2 modes, GB and GBA, they just set which pins are input/outputs) and read the SRAM like we normally would by pulsing RD and CS2 low. The PC side code (not shown), is almost a direct copy of the reading ROM code.
gb_mode(); // Set GB mode as it uses 16 bit address with 8 bit data
usart_read_64_bytes();
for (uint8_t x = 0; x < 64; x++) {
	gba_write_ram_8bit_data(address, receivedBuffer[x]);
	address++;
}
USART_Transmit('1'); // Send back acknowledgement
gba_mode(); // Set back
...

void gba_write_ram_8bit_data(uint16_t address, uint8_t data) {
	set_16bit_address(address);

	GBA_DDR_RAM_DATA7_0 = 0xFF; // Set data pins as outputs
	GBA_PORT_RAM_DATA7_0 = data; // Set data

	// Pulse WR
	wrPin_low;
	cs2Pin_low; // CS2 pin low for SRAM/Flash select

	asm volatile("nop");
	asm volatile("nop");

	cs2Pin_high;
	wrPin_high;

	// Clear data outputs and set data pins as inputs
	GBA_PORT_RAM_DATA7_0 = 0;
	GBA_DDR_RAM_DATA7_0 = 0;
}
Writing to the SRAM is the same too, as mentioned before, I chose to read all 64 bytes to the USART first and then perform the SRAM write afterwards. When writing, we just pulse WR and CS2 low.
Determining ROM size
Due to the fact that the GBA header information doesn’t tell us anything about the ROM, RAM/Flash/EEPROM sizes, we’ll have to figure out a way to check/test this for ourselves. Having bought a few cheap GBA cartridges, 2 with EEPROMs, 1 with SRAM, 1 with Flash (some of them have different ROM sizes), I can check what happens when for example if we read a cartridge that has an EEPROM like we are reading SRAM.
For calculating the ROM size, from my testing it appears that reading past the ROM size produces all 0x00’s, so that is simple for us to implement however we don’t want to read the whole ROM when checking for the size but we can’t just check the start of 4MB chunks as some ROMs can have valid data as 0x00 there.
uint8_t gba_check_rom_size (void) {
	set_mode(GBA_MODE);

	uint32_t fourMbBoundary = 0x3FFFC0;
	uint32_t currAddr = 0x1FFC0;
	uint8_t romZeroTotal = 0;
	uint8_t romSize = 0;

	// Loop until 16MB
	for (uint16_t x = 0; x < 256; x++) {
		set_number(currAddr / 2, SET_START_ADDRESS); // Divide current address by 2 as we only increment it by 1 after 2 bytes have been read on the ATmega side
		set_mode(GBA_READ_ROM);

		com_read_bytes(READ_BUFFER, 64);
		RS232_cputs(cport_nr, "0"); // Stop read

		// Check how many 0x00 are found in the 64 bytes
		uint8_t zeroCheck = 0;
		for (uint16_t c = 0; c < 64; c++) {
			if (readBuffer == 0) {
				zeroCheck++;
			}
		}
		if (zeroCheck >= 64) { // All 0x00's found, set 1 more to the ROM's zero total count
			romZeroTotal++;
		}

		// After a 4MB chunk, we check the zeroTotal, if more than 30 then we have reached the end, otherwise reset romZeroTotal
		if (currAddr % fourMbBoundary == 0 || currAddr % fourMbBoundary < 256) {
			if (romZeroTotal >= 30) {
				break;
			}

			romZeroTotal = 0;
			romSize += 4;
		}

		currAddr += 0x20000; // Increment address by 131K

		if (x % 10 == 0) {
			printf(".");
		}
	}

	return romSize;
}
The maximum ROM size is 16MB so I divide that by 256 and read 64 byte chunks of those addresses. We keep track of how many 0x00 in the 64 bytes we read, if all are 0x00, we increment our romZeroTotal variable and as reading the ROM is 16-bit data per address, we divide our start address by 2 when we send it to the ATmega. ROM sizes possible are 4MB, 8MB or 16MB so after a 4MB chunk if enough 0x00’s weren’t found, we continue with the check and increment the ROM size variable by 4.
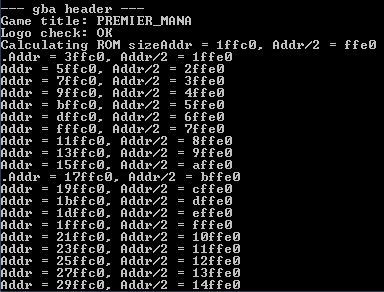
Just for a visual representation on what’s going on, I printed out the addresses so you can see.
Determining SRAM size
From my testing, when a cartridge doesn’t have SRAM or Flash, it reads back all 0x00’s but like before we need to check multiple spots on the SRAM. This time if we read a cartridge that does have SRAM past it’s size it loops around and starts back from the beginning but sometimes it seems that not all the bytes match up 100%, it’s like 90%. The SRAM sizes possible are 256Kbit or 512Kbit.
uint8_t gba_check_sram_flash (void) {
	set_mode(GBA_MODE);

	uint16_t currAddr = 0x0000;
	uint16_t zeroTotal = 0;

	// Test if SRAM is present, read 32 sections of RAM (64 bytes each)
	for (uint8_t x = 0; x < 32; x++) {
		set_number(currAddr, SET_START_ADDRESS);
		set_mode(GBA_READ_SRAM);

		com_read_bytes(READ_BUFFER, 64);
		RS232_cputs(cport_nr, "0"); // Stop read

		// Check for 0x00 byte
		for (uint8_t c = 0; c < 64; c++) {
			if (readBuffer == 0) {
				zeroTotal++;
			}
		}

		currAddr += 0x400;

		if (x % 10 == 0) {
			printf(".");
		}
	}
	if (zeroTotal >= 2048) { // No SRAM or Flash
		return 0;
	}
	...
Firstly we’d like to check the presence of SRAM/Flash, so we will divide by the 32KB (256Kbit) address space by 32 and check 64 bytes for all 0x00’s, kind of how we did for the ROM checks except we don’t need to divide the start address by 2 (8-bit data).
uint16_t duplicateCount = 0;
char firstBuffer[65];
char secondBuffer[65];
for (uint8_t x = 0; x < 32; x++) {
	set_number((uint32_t) (x * 0x400), SET_START_ADDRESS);
	set_mode(GBA_READ_SRAM);
	com_read_bytes(READ_BUFFER, 64);
	memcpy(&firstBuffer, readBuffer, 64);
	RS232_cputs(cport_nr, "0"); // Stop read

	set_number((uint32_t) (x * 0x400) + 0x8000, SET_START_ADDRESS);
	set_mode(GBA_READ_SRAM);
	com_read_bytes(READ_BUFFER, 64);
	memcpy(&secondBuffer, readBuffer, 64);
	RS232_cputs(cport_nr, "0"); // Stop read

	// Compare
	for (uint8_t x = 0; x < 64; x++) {
		if (firstBuffer[x] == secondBuffer[x]) {
			duplicateCount++;
		}
	}

	// Progress
	if (x % 10 == 0) {
		printf(".");
	}
}
if (duplicateCount >= 1500) {
	return SRAM_FLASH_256KBIT;
}
return SRAM_FLASH_512KBIT;
Now if SRAM was detected, we can check if the 64 bytes in the 256Kbit space match the ones in the 512Kbit space, if most of them do, we know we have a 256Kbit SRAM/Flash but if they don’t then we have a 512Kbit SRAM/Flash. Later on (in part 3) we will need to check if we have SRAM or Flash.
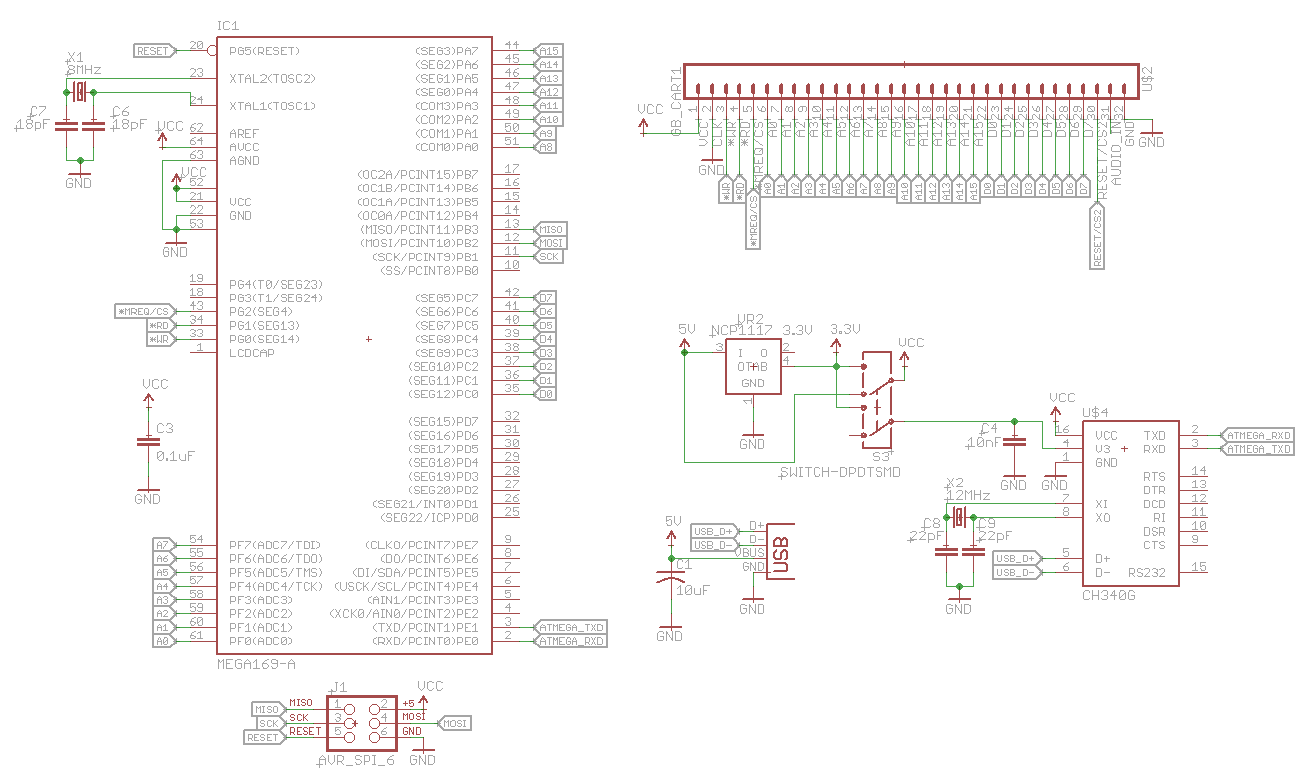
Here’s how our schematic looks at the moment. Download GBxCartRead_v0.2
In the next part, we’ll look into reading/writing to the EEPROM and writing to the Flash, determining those sizes and then we are pretty much done. Unfortunately I don’t have any carts that have an Atmel flash or 1Mbit so I won’t be able to test those.
GBxCartRead – Part 1: Design and Testing Gameboy Carts
GBxCartRead – Part 2: Switching to CH340G, GBA ROM reading, SRAM read/write and determining sizes
GBxCartRead – Part 3: GBA EEPROM Read/Write & Flash Write and Determining Sizes
GBxCart RW v1.0 Released


