The PIR PCBs have arrived to be used on my alarm system.
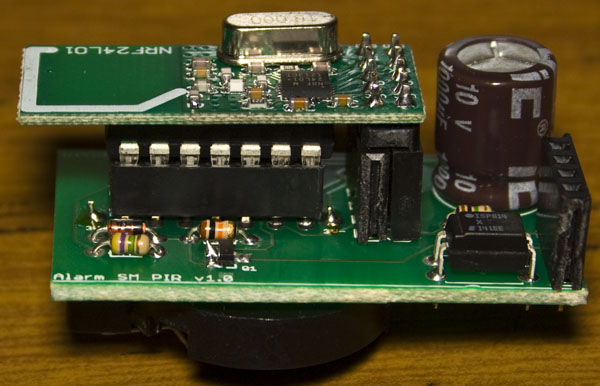
It all fits in nicely, with the nRF24L01 on top of the ATtiny and the 3V battery holder on the bottom.
After testing 4 PIR boards at a time it seemed to work however after a few days of testing there seemed to be a board which would fail to connect. I connected up my logic analyser to a working PIR board and then to the one that wasn’t working after some time and below is the capture after it loads the random data to transmit.
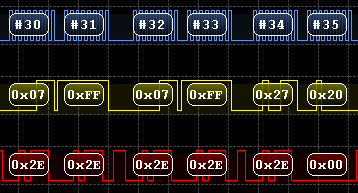
Working PIR
Not working PIR
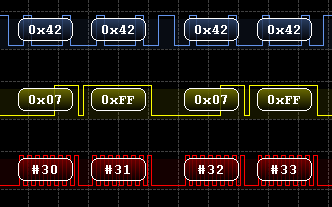
As you can see both request the status by sending 0x07 however the response is 0x2E vs 0x42 (Also notice how it sends us the reply on the same packet that we send the status request).
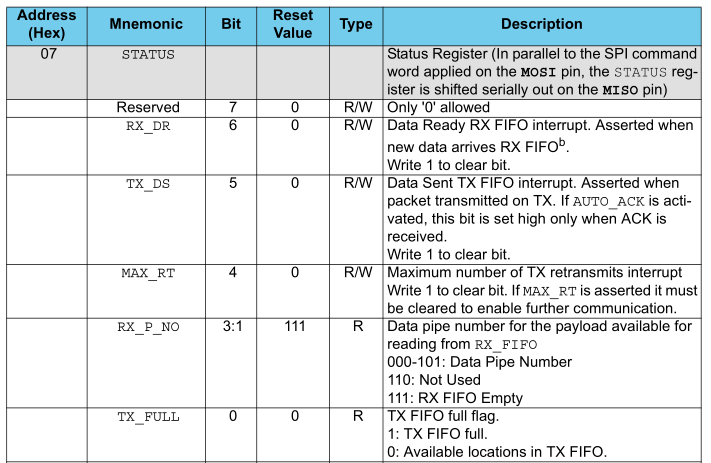
0x2E is 101110 which shows that the RX FIFO is empty and the Data Sent Tx FIFO is set. Since I have auto acknowledge on, this means that when the nRF24L01 sends the data, it quickly switches to RX mode and waits to hear back.
0x42 is 1000010 which shows that Data Sent Rx FIFO is set and the Data Pipe Number is 1. So it’s saying that there is already a packet in the RX FIFO waiting to be read out.
// Send data and wait for an ACK
uint8_t mirf_transmit_data(void) {
  TX_POWERUP; // Power up to transmitter mode

  mirf_CSN_lo; // Pull down chip select
  spi_transfer(FLUSH_TX); // Write cmd to flush tx fifo
  mirf_CSN_hi; // Pull up chip select

  mirf_CSN_lo;  // Pull down chip select
  spi_transfer(W_TX_PAYLOAD); // Write cmd to write payload
  spi_write_data(data_out, mirf_PAYLOAD); // Write payload
  mirf_CSN_hi; // Pull up chip select

  mirf_CE_hi; // Start transmission
  _delay_us(15);
  mirf_CE_lo;
  ...
}

// Receive data
uint8_t mirf_receive_data(void) {
  RX_POWERUP; // Power up to receiver mode
  mirf_CE_hi; // Start listening
  ...
  mirf_CE_lo; // Stop listening

  mirf_CSN_lo; // Pull down chip select
  spi_transfer(R_RX_PAYLOAD); // Send cmd to read rx payload
  spi_read_data(data_in, mirf_PAYLOAD); // Read payload
  mirf_CSN_hi; // Pull up chip select
  mirf_config_register(STATUS,(1<<RX_DR)); // Reset status register

  return 1;
}
When sending data, we flush the TX FIFO and then begin the transmission. When receiving data we just start listening and then stop listening. I think what may be happening is that when it was originally working, when transmitting data and waiting to listen for an acknowledge packet, it could potentially pick up the server sending data to another PIR (because I made the PIRs have the same addresses).
Once that packet is received because we never clear the RX FIFO, it will stay there and eventually the RX FIFO becomes full that the auto acknowledgement packets we are getting back never make it to the RX FIFO.
// Send data and wait for an ACK
uint8_t mirf_transmit_data(void) {
  TX_POWERUP; // Power up to transmitter mode

  mirf_CSN_lo; // Pull down chip select
  spi_transfer(FLUSH_RX); // Flush RX
  mirf_CSN_hi; // Pull up chip select

  mirf_CSN_lo; // Pull down chip select
  spi_transfer(FLUSH_TX); // Write cmd to flush tx fifo
  mirf_CSN_hi; // Pull up chip select

  ...
}

// Receive data
uint8_t mirf_receive_data(void) {
  RX_POWERUP; // Power up to receiver mode

  mirf_CSN_lo; // Pull down chip select
  spi_transfer(FLUSH_RX); // Flush RX
  mirf_CSN_hi; // Pull up chip select

  mirf_CSN_lo; // Pull down chip select
  spi_transfer(FLUSH_TX); // Write cmd to flush tx fifo
  mirf_CSN_hi; // Pull up chip select
  mirf_CE_hi; // Start listening
  ...
  return 1;
}
The solution to this problem is to clear the RX FIFO before transmitting. The reverse problem could potentially happen too when we are waiting for data and we receive a auto acknowledgement instead of the real data so I’m going to clear RX and TX before receiving or transmitting.
After leaving it for a couple of days, it all seems to be working correctly now. Download AlarmSM_PIR_v0.3_Server_v0.2_Siren_v0.2
Part 1
Part 2: Two way communication for PIR sensors
Part 3: Secure communication
Part 4: Adding on sirens and SMS sending
Part 5: Modifying the PIR sensor
Part 6: PIR PCB
Part 6.5: PCBs arrived
Part 7: See which sensors check-in
Part 8: Building our own alarm system
Part 9: Remote control and attempted improvements
Part 10: Prototype PCBs


